![]()
![]()
![]()
![]()
![]()
![]()
![]()
![]()
Microsoft Small Business Server 2000, Part 4
by Andy Goodman
Well it is time to install the servers and as promised earlier detail how to transfer our data from the old SBS 4.5 System to the new SBS 2000 System. As mentioned in the first article of the series, don't try to do an "In Place" upgrade of the SBS 4.x Server. I have yet to see it work completely. That is why we are having to transfer the data.
Servers
Installing the Servers is really pretty straight forward. The folks at Microsoft really listened on this one. You can now pick and choose which Servers you want to install, unlike previous versions where you had no choice but to install everything. Of course you have your plan (remember you wrote it out when we started) so you know which ones you're going to install. Most people I've talked to start off with Exchange, ISA and the Fax Server. You can always go back and add or remove them with SBS 2000 so your not locked into this decision.
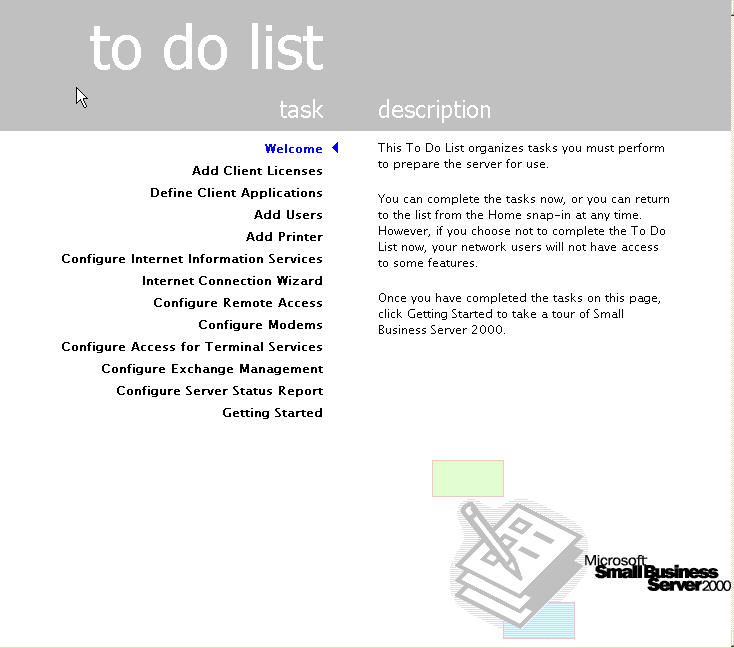
After you have rebooted from the first part of the installation (where we left off in part 2) you are presented with the option to continue the install. Choose not to at this time, you'll get another chance every time you reboot until you finish. Take this opportunity to checkout the newly installed server. Make sure everything is working correctly and you have no errors in the logs. We need a solid foundation to build on. When your sure everything is good reboot and choose to start the install. DC-promo will run and convert the server to a Domain Controller installing Active Directory in the process. You have nothing to do at this point but maybe have a coke. The installation program will reboot and present you the list of choices I discussed above. From here on it is pretty much automated and you can relax again until the install finishes. When it does you will be presented with a to do list.
User Accounts
Of course you add users with the Add User link on the to do list which you can always find in the Administrators Console. You should create all the user accounts before moving the data so the structure is already in place. That isn't the main reason for this section however.
We need to talk about preparing the user accounts on the
old system for the data transfer. Now that everyone is off the system, you need
to take over control of the data. You can't move it if you don't have
permissions. The easiest way I have found to do this is to open a DOS box (OK,
command window) and run the following command from the root of each drive.
CACLS * /e /t /c /g Administrator:F System:F
If cacls comes to a file that it can't change the rights to it stops; showing
you the file and the path so you can take ownership of it. Then you just re-run
the command again until it completes successfully. Don't worry about messing up
the permissions of these files and folders. We are going to get rid of all those
conflicts in the next section.
Just one more thing related to user accounts we need to
take care of before moving on. You need to change the passwords on all the user
accounts to something simple you will remember like sbs+upgrade. You will need
to be able to log on as each user and you probably don't know all the passwords
and even if you do this will simplify you life for the next few hours.
The Data Transfer
There is more than 1 type of data and more than 1 location the data is stored in that we need to be concerned with. Of course everybody's layout is different, but there are some generalizations we can apply. You have a Users Folder somewhere with sub-folders for each user. You also have private exchange data, public exchange data and maybe an internal or external website hosted on the SBS box. You may have some SQL data also, although I have yet to meet anyone using SBS who does. If you are one of the few please see the Microsoft KB article Q314546 as I won't be going into it here.
So we are almost ready to transfer, but we need a place to transfer to. I recommend either finding a workstation with a big empty drive or just adding one to an existing workstation. Make sure it is a reasonably powerful system. The main thing we want to do is format this drive or large partition using Fat32 not NTFS. By doing this we will wipe out all the old security information and make sure it does not come back to haunt us later. All of the SID's on all those files will be orphaned when we move them to the new server if we use an NTFS partition. Since Fat32 has no way to deal with SID's they will be discarded and we can start clean on the new SBS 2000 system.
So now you can copy all the users data to the temporary partition we just created by dragging and dropping the entire users folder tree in explorer. If you have public and private user folders, make sure you copy them both. Don't forget the Company folder and any custom folders you may have created on the system. While you are at it, create a folder off the root of the new partition called 1_pst_files this will be used later. By using this name trick the file will show up at the top of an alphabetical list.
Next, if you have a public or private website hosted on the old SBS box fire up FrontPage, open the site and re-publish it (or them) to the temporary system.
Export Personal Data
Lastly, but the one that will cause you the most grief with users if something goes wrong, is the Exchange Data. There is a utility for exporting the mailboxes available on the Microsoft site, but I have had unofficial warnings not to trust it. So we'll do it the old fashioned way. You may have never had to do this so I will try to detail it for you with a number of screen shots. You are going to need to log on to our temporary workstation as each user 1 by 1 and perform the following procedure. Aren't you glad we changed all those passwords to the same one earlier!
1. Open Outlook, you are logged on as the user so you see
all their data.
2. Make sure you are showing the Folder List, if not click View then
Folder List
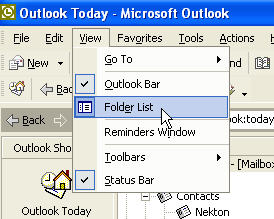
3. Click once on the top of the tree it will say Outlook Today - Mailbox - [(UserName)]
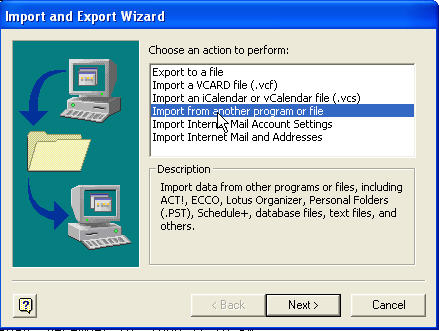
4. Click File, then Import and Export...

5. Click Export to a file, Click Next
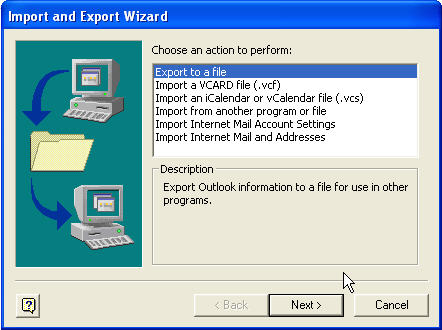
6. Click Personal Folder File (.pst), Click Next
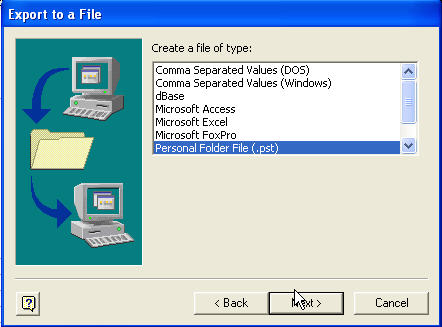
7. In the "Select folder to export from:" pick
Mailbox - (UserName)
8. Make sure to check Include Subfolders
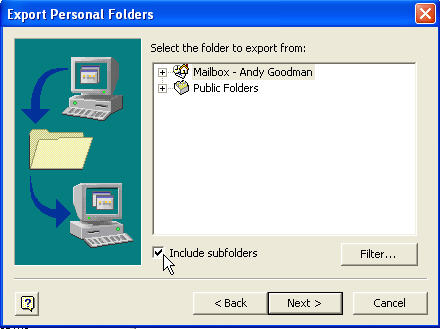
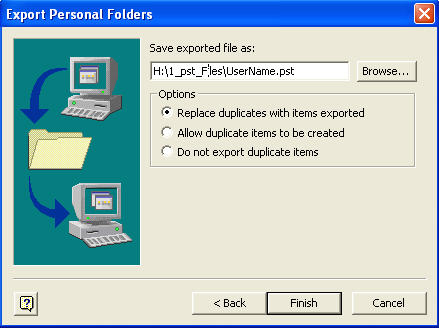
9. In the "Save exported file as:" field set it to our handy folder on the temporary drive and name the file with the users name you are currently logged in as, and don't forget the .pst file extension. Take the default of Replace duplicates with items exported. That way if you have to rerun for any reason you will have the most current data with no duplicates.
10. The window below appears with Personal Folders under name
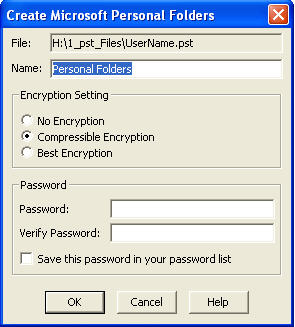
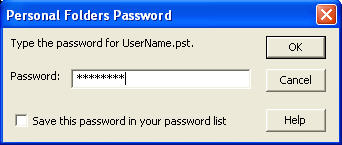
11. I like to change it to the Users Name so I don't get lost during the process.
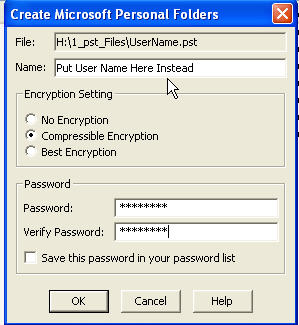
12. Give the file your handy temporary password (the one you used for all the user accounts) This will keep your users Exchange Data private if someone else gets on the temporary system. Do not check the save password box.
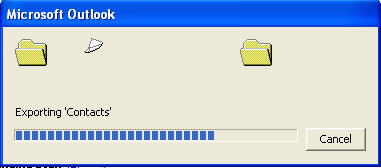
13. Now depending on how much the user has stored in Exchange the wizard will export the data.
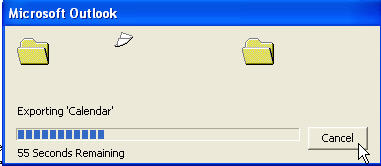
14. You will see a number of these windows go by, one for each folder or sub-folder. Some go by so quick you don't see them.
15. When it is done you will have a file for the user you were logged on as
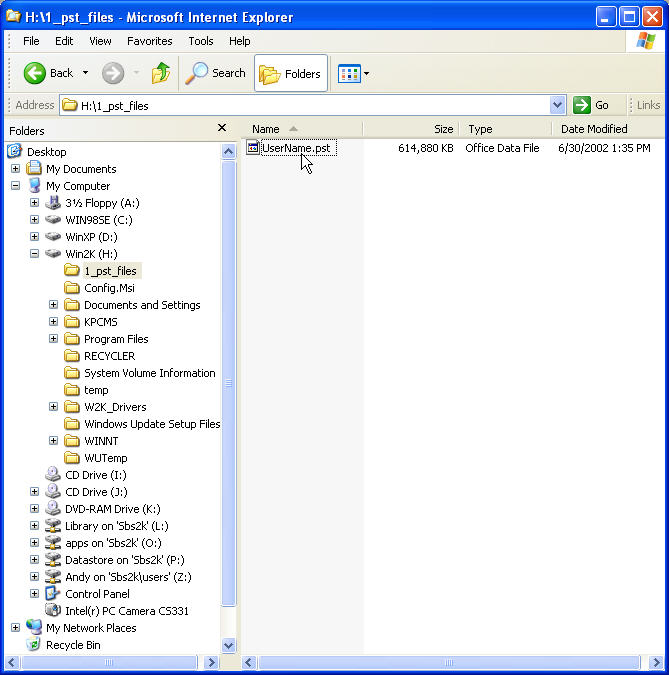
16. This sample I did of my own Exchange Data was about 614 Mb and took a little under 1/2 hour. Of course I am a pack rat.
Export Public Folders
Now if you have Public Folders with data in them you will need to log on as the owner of each folder and repeat this process changing step 7 to the public folder you want to save. If you have more than 1 do them individually by the owner.
Import Personal & Public Folders
When you are ready to Import the Users Exchange Data just follow the same procedure for each user and each public folder changing step 5 to Import from another program or file
Finishing Up the Data Transfer
Later when you have the rest of the server configured (the to do list) you can fire up FrontPage again and re-publish your websites to the new SBS 2000 Server. This would also be a good time to copy back all the user's private and public data. Make sure you copy the data and not move it. If you copy the data it will inherit the permissions of the user's folder you copy it into. If you move the data it retains the permissions it currently has which are everyone by default, as it is coming from a Fat32 partition.
Notes
Next time I will have some tips and gotcha's to watch out for when you configure your server.
Also coming soon a review of Executive Software's Site Keeper
Additional SBS Resources
DownHome Computers (my company) Specializes in Small Business Server
The folks at MCP have given us a forum for SBS you can find it HERE
A great book on SBS read the REVIEW
Other areas of SBS interest at swynk.com
WINDOWS SERVER AREA,
EXCHANGE AREA,
SQL AREA